A slight grinding noise in the back of the car was one of the very few things I did not like, after buying a nice six year old Octavia II (130.000 km). Having done a similar job on my 45 year old Volvo Amazon, I would hope that I would be capable of doing the same on a modern car.
After studying on the internet for several evenings I decided it was possible. Main challenges seemed to be getting the right tools (simple hexagon bolts and nuts seem to be old school, or the Volkswagen people just don’t like amateurs working on their cars), and a torque of “180 Nm plus 180 degrees” on the only bolt holding the rear bearing and thus the wheel to the car. The 180 Nm I could imagine: an arm of 1 meter and a force of 18 kilos, that does not sound too impressive, but how much elbow grease would the “plus 180 degrees” mean?
After getting what I thought were the the required tools I took off the rear wheel to double check if that would not get me halfway into the job finding out I was still missing something, ending up with a car that could not make it safely to the garage any more. And I was missing some equipment. Below is the final recipe for transplanting the old bearing for a new one:
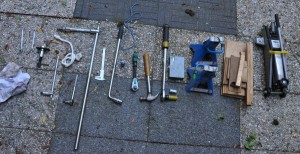
Tools needed:
- telescopic socket wrench (17 mm)
- wheel stops (you are will be releasing hand brake while working on the car)
- car jack (2 tons)
- two adjustable axel stands
- torque wrench 1/2 inch, 20-200 nm
- small rope for suspending the caliper
- strong rope for pulling the breaker bar when removing the m14 caliper holder bolts
- Loctite (blue)
- Torx 30 bit (brake disk screw)
- pieces of wood
- claw hammer
- 1/2 inch socket wrench
- 1/2 inch (female) to 3/4 inch (male) adapter
- 1/2 inch breaker bar
- 3/4 inch breaker bar
- M18 XZN (Volkswagen tool T10162) 3/4 inch socket for axel bolt
- pair of callipers to measure the disk thickness
- M14 XZN 1/2 inch socket for caliper holder bolts
- M15 wrench
- M13 wrench
- old cloth
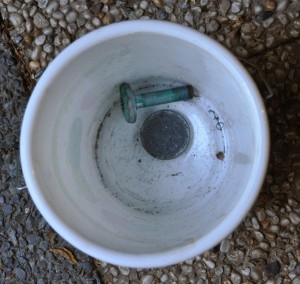
- bucket to store nuts and parts removed
- gloves (or do you?)
Parts needed:
- VKBA 3644, which is a flange with a bearing inside, new M18 XZN screw and dust cap. Several brands are available. I chose for SKF.
Work steps (took me less than two hours the first time):
1. place wheel stops behind, in front of wheels and release the hand brake
2. loosen the wheel nuts slightly
3. jack up the car as high as reasonably possible (you will need space for a 30cm breaker bar pointing down)
4. place axel stand (never trust the jack alone or bricks that can break) and lower car onto it
5. remove wheel nuts
6. remove wheel
7. remove two caliper bolts with a 13mm plus a 15mm spanner: place the spanners such, that you can squeeze them towards each other to generate the required force.
8. lift of the caliper and suspend it from a rope from the shocks, so there will not be a lot of force on the hydraulic line.
8. remove two caliper holder bolts: 14mm triple square (XZN) with 30 cm 1/2 inch breaker bar. If you do not remove this part than you cannot remove the brake disk and thus the bearing (nasty design). The breaker bar points to the floor. I use a rope attached to the end of the breaker bar, sat behind the car on the removed wheel, put my right foot on the axel and pulled with 2 hands on the rope, backwards. The nut was tightened with 90 Nm plus 90 degrees and may be corroded, so you will need some force.
The breaker bar was good for two reasons: lots of force and there was too little room to fit my socket wrench.
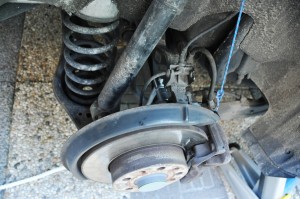
M14 XZN breaker bar in caliper holder bolt. The white rope is attached to the end of the breaker bar, so two hands can be used to pull, with one foot resting on the axel.
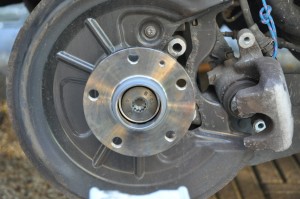
9. remove the small screw (Torx 30) keeping the brake disk in place
10. Knock off the brake disk. This took me quite some effort: I used a short piece of wood and a the backside of a splitting axe held to the edge of the disk. Be careful not to damage the disk doing so.
11. pull of the dust cap. I use a “claw hammer” and gently worked my way around. You will discard it and the flange too, so you can be brutal.
Finally the dreaded “180nm plus 180 degrees M18 XZN” is in sight!
12. To remove the M18 XZN:
- place a axel stand in front of the wheel nut, at a similar height (see photo). Use the M18 nut, extension and breaker bar and rest the extension on the axel stand, close to the breaker bar. This way the M!8 nut will only receive a rotational force and not a force perpendicular to the nut, which could result in big trouble (damage, injury).
I used a 70mm 1/2 inch breaker bar, which looked over sized when I got it, but that feeling will disappear soon: place the breaker bar and possibly and extension at “9 o’clock”. Place your foot on the end of the breaker bar and discover that that is not enough force. Next step is to stand on the breaker bar and discover you are not heavy enough. The jump up and down a little but and if you are lucky, there will be some movement. I was using a stainless steel pipe to get another half meter extension, and was seriously fearing the bear would break to peaces exploding with lethal energy in arbitrary directions. I was very happy to have spent my money on a Gedore breaker bar and an original Volkswagen M18 nut when the nut was finally out.
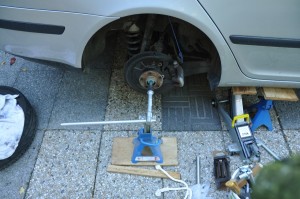
Unscrew the axel bolt by supporting the extension with an axel stand, and standing on the breaker bar.
13. Pull off the flange plus bearing. Though it was rusted, it did not take me a lot of force to take it off and the axle was still shiny underneath.
14. Put on the new flange plus bearing. Be careful to put it on straight an make sure the axle is clean (rust, dust and sand). The first millimeters are tricky but the it should slide on smoothly.
15. And now for the “piece the resistance”: putting on the M18 axel bolt with “180 Newton meters plus 180 degrees”. Just dial in the 180 Nm and tighten the bolt (new bolt, do not use the old one!) until the thing goes click. Then place the axel stand again see photo), rest the 1/2 inch extension on it and place the breaker bar at “3 o’clock”. On the bolt there are several markings. Take note of the a marking and imagine it being rotated 180 degrees. Mental preparation is everything. After about 30 degrees most people give up, not you. I ended up standing on the extension bar with both feet, jumping up and down like it was a springboard until 180 degrees was reached. I estimate that must be between 800 and 1600 Nm, once to twice my weight on a 1 meter bar.
After this you are a member of the “180 Nm plus 180 degrees” and nothing can stop you now. Some small stuff:
16. – Hammer on the dust cap. Use a flat piece of wood to hold the new dust cap flat on the flange so you hammer it in straight and do not damage it with the hammer.
17. Place the brake disk back (of course you check the thickness: this would be the ideal moment to put on a shiny new one if required. 8 mm seems to be the lower threshold for replacement).
18. Screw in the brake disk holding screw torx30.
18. Place back the caliper holder (2x M14 XZN, 90 Nm plus 90 degrees, but I did it by guestimation to be honest). Apply some Loctite to prevent it from rattling loose.
19. Spread the caliper piston slightly with a rewind tool. It take a lot of force and the piston apparently needs to rotate while being pushed back.
19. Place back the caliper (do not forget to remove the rope) and tighten the two nuts (35 Nm) with some Loctite.
20. Put the wheel back on
21. Put on the wheel nuts
22. Engage hand brake
23. Jack up the car and remove axel stand
24. Lower the car and torque on the wheel nuts (110 Nm for aluminum rims)
25. Facing the wheel take two steps back, rub your hands in an old cloth and stand proud: you did it!
26. Get in the car and press the brake pedal several times. This will take the slack out of the piston that was pushed back.
27. Remove wheel stops and take it for a ride!
